Table of Contents
Tariffs
Tariff plans
This section appeared in version 2.2.0.
To go to the section, open the "Service Management" menu and click "Tariff plans".
The section looks like the picture below.
Billing Profiles
Here you can create billing plan profiles, as well as edit and delete them.
You can manage tariff plans for only one selected equipment.
Create a billing plan profile
This form must include:
- Tariff plan name
- Speed limit for incoming traffic
- Speed limit for outgoing traffic
- When you click on the "Save" button, a tariff will be created with the configuration specified in the form.
- When you click on the "Save and continue" button, a tariff plan will be created with the configuration specified in the form, and the form for creating a tariff plan will re-open using the configuration of the current tariff plan.
Edit billing profile
In this form, you can only change the name of the tariff plan.
- When you click on the "Save" button, the name of the tariff plan will be changed.
- When you click on the "Copy tariff" button, a new tariff plan will be created with the configuration of the selected tariff plan profile.
Billing plan configuration
Here you can edit the tariff plan profile configuration.
More details about the configuration of tariff plans in the Subscribers channel policing section.
Simplified form
In this form, it is possible to set the speed of incoming and outgoing traffic (similar to the form for creating a tariff plan profile).
Normal form
In this form, it is possible to set the following values for each of the classes:
- rate - minimum bandwidth size;
- ceil - maximum stripe size;
Ceil for the root class is optional.
Extended form
In this form, it is possible to select the type of policing (HTB or TBF).
Depending on the selected type of policing in the form, it is possible to edit different data for each of the classes.
For HTB policing type:
- rate - minimum bandwidth size;
- ceil - maximum stripe size;
- burst;
- cburst;
For TBF policing type:
- rate - band size;
- burst;
Editor
Manage subscriber tariff plans
It is described in detail in the section Subscribers and services
Tariff schedule
This section allows you to create schedule for tariff plans. After the schedule is created and saved, selected sub-tariffs will be applied according to its settings.
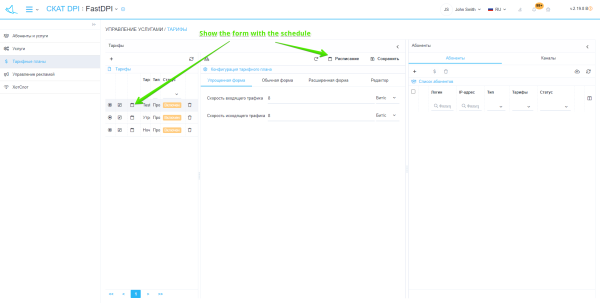
To open the form with the schedule of the tariff plan, you should to select one of the tariff plans in the “Tariff plans” section and click on the “Schedule” button. You can also open the form by clicking on the calendar icon located opposite each tariff plan.
(Figure 1)
Tariff plan schedule setting form
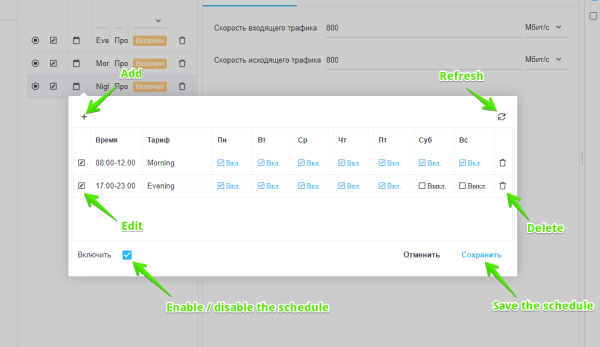
Here you can create, modify and delete a schedule for the selected tariff plan.
Also, you can disable the schedule for a particular tariff plan.
(Figure 2)
On this form are located:
- “+” button – opens the form for add a schedule line (Figure 3).
- “Edit” button – opens the form for edit the selected schedule line (Figure 4).
- “Refresh” button – returns the table to its origin state.
- “Delete” button – deletes the selected schedule line.
- The “Enable” flag in the selected state enables the schedule, in the unselected state disables the schedule.
- “Cancel” button – closes the form.
- “Save” button – saves the form (Necessarily click the button, otherwise all unsaved changes will be lost).
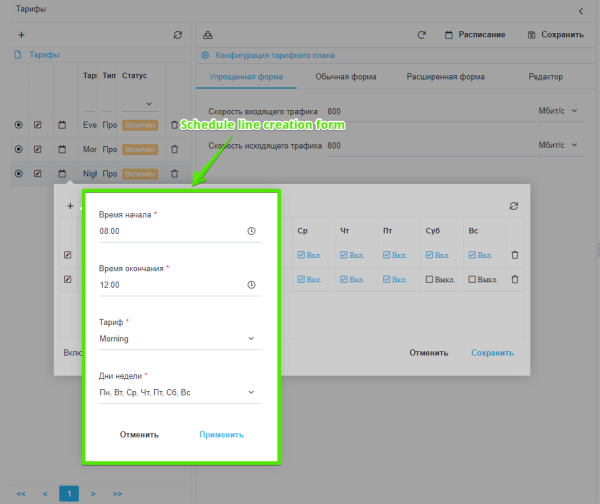
Create a tariff plan schedule
(Figure 3)
You must specify the following in this form:
- The time from which the schedule begins to operate.
- The time after which the schedule stops to operate.
- Name of the tariff plan whose settings will be used by the tariff plan for which the schedule is created.
- Days of the week on which the schedule will be active.
- Click on the “Apply” button will create a schedule line with the configuration specified in the form.
- Click on the “Cancel” button the form will close.
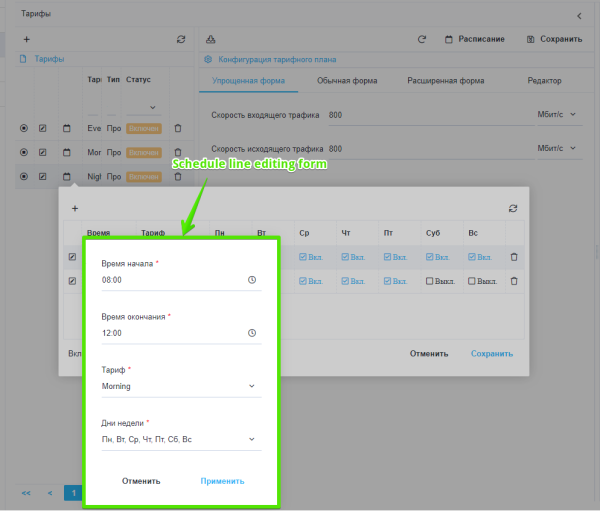
Edit the schedule of the tariff plan
You can modify the time, tariff name, and days of week in this form.
- Click on the “Apply” button for the selected schedule line will change the corresponding values.
- Click on the “Cancel” button the form will close, the changes made will be canceled.
Was this information helpful?


